Learn APIs for Rails
Do you want to make a really cool app? With a really cool space API? OF COURSE YOU DO, IT’S SPACE!
Great! You’re right where you need to be.
Our really cool SPACE APP
Background
The idea for this app was conceived as a learning exercise for myself by mentor Barrett Clark, and I turned it into a live tutorial/demo for the Women Who Code DC’s Ruby on Rails group. The goal of this tutorial is to de-mystify APIs for Rails developers. I hope it accomplishes that for you! A live version of this app can be found here.
Beginner’s Notes
When I have something that looks like this, with the dollar sign in front, it means it goes in the terminal.
$ i_am_the_terminalator
Other code goes in files, and the file name will be mentioned somewhere in the paragraph immediately before the code.
(If there’s something else I should mention, please leave it in the comments!)
Setup
First, we create a new Rails app.
In your terminal/command line:
$ rails new NasaApodApi
$ cd NasaApodApi
Then, we’ll immediately initialize a git repository to get things started:
$ git init
$ git status
$ git add .
$ git commit -m “initial commit”
After we have everything committed initially, I’m going to modify the gemfile a bit to suit my needs.
I will be commenting out coffeescript because I don’t use it and don’t want any weird dependencies happening. While we’re in the gemfile we’re also going to add in the ruby version that you’re using, this will help later if you decide to push to heroku (heroku requires your version of ruby to be specified).
Add “#” in front of coffeescript-rails gem in the gemfile (in the root folder of your app) to comment it out:
# gem 'coffee-rails', '~> 4.1.0'
Add ruby 2.2.3 (or your version of ruby, found in the terminal by doing ruby -v) to the gemfile as well:
ruby '2.2.3'
Run bundle install to install all the gems, minus coffeescript, and commit:
$ bundle install
$ git status
$ git add .
$ git commit -m “update gemfile to not include coffeescript and state ruby version”
Let’s start the server and make sure everything installed correctly:
$ rails s
Navigate to localhost:3000 in your browser and you should have the standard rails app page.
If it throws an error pertaining to a database, it’s because we haven’t set one up yet. This may happen if you default to postgres, but possibly not if you use sqlite. If you get the error, run this command:
$ rake db:create
Restart your sever (to quit your rails server, press Ctrl+C, then use rails s again) and you should be okay.
We actually aren’t using a database at all in this tutorial, so as long as it shows us the pretty pictures in the end, correct database usage & setup shouldn’t be a big concern. Everything comes directly from the API.
Adding a Model
Now we’ll want to create our model, which will do all the thinking about where to go to fetch the picture. We’re also going to use the skip-migration and skip-fixture flags because we don’t need a migration, we’re not concerned about persisting anything to the database. And we’re going to use the pretend flag just to see that it’s creating everything we need.
$ rails g model Nasa-api --skip-migration --skip-fixture --pretend
That gives us:
 invoke active_record
 create app/models/nasa_api.rb
 invoke test_unit
 create test/models/nasa_api_test.rb
So, that looks good. We’re going to go ahead and create this model:
$ rails g model Nasa-api --skip-migration --skip-fixture
Okay so lets go and double check that it was indeed created in our app folder (you should see app/models/nasa_api.rb , and commit those changes:
$ git add .
$ git commit -m “add nasa-api model”
Understanding the API
So at this point you’re probably like, okay but what is an API?
Check out the page with the API information from NASA: https://api.nasa.gov/api.html#apod
There, you’ll see info about what the API does, what parameters it takes, and the example URL with DEMO_KEY after the “?api_key=” parameter in the URL: https://api.nasa.gov/planetary/apod?api_key=DEMO_KEY
Click on that and take a look at what it shows you. This kind of looks something like a hash, right? It has key-value pairs:
{
"copyright": "Roberto Colombari",
"date": "2016-04-28",
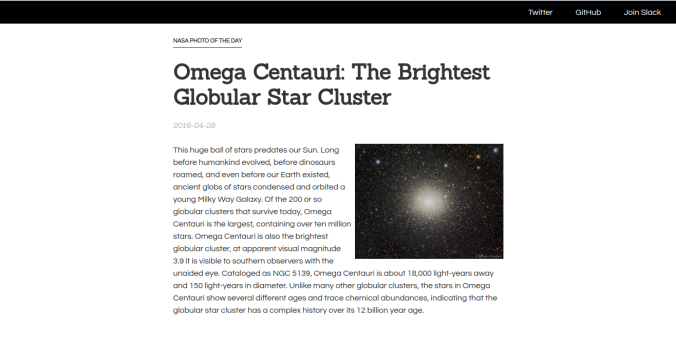
"explanation": "This huge ball of stars predates our Sun. Long before humankind evolved, before dinosaurs roamed, and even before our Earth existed, ancient globs of stars condensed and orbited a young Milky Way Galaxy. Of the 200 or so globular clusters that survive today, Omega Centauri is the largest, containing over ten million stars. Omega Centauri is also the brightest globular cluster, at apparent visual magnitude 3.9 it is visible to southern observers with the unaided eye. Cataloged as NGC 5139, Omega Centauri is about 18,000 light-years away and 150 light-years in diameter. Unlike many other globular clusters, the stars in Omega Centauri show several different ages and trace chemical abundances, indicating that the globular star cluster has a complex history over its 12 billion year age.",
"hdurl": "http://apod.nasa.gov/apod/image/1604/OmegaCen_Colombari_1833.jpg",
"media_type": "image",
"service_version": "v1",
"title": "Omega Centauri: The Brightest Globular Star Cluster",
"url": "http://apod.nasa.gov/apod/image/1604/OmegaCen_Colombari_960.jpg"
}
This is what’s called JSON, which stands for JavaScript Object Notation.
That hash-looking thing is actually called an “object” in JavaScript, so the “JSON” acronym makes sense. The advantage here is that instead of hard coding in that object and changing it everyday to get the picture of the day, you can just set that URL to a variable in your app and it will update as the API updates.
To use this API, you’ll need to get an API key. Many APIs will require you to use a unique API key.
If you’re not familiar with what an API key is, basically it allows you to “log in” to a service without using a login/password combination. This also means that you want to treat this like any other login and password and not let other people use it.
In our case this means don’t push your API keys to Github! Don’t do it!
It’s actually not a huge deal for the NASA one, since it’s free. It does have a limit of 1000 requests per hour, so it may stop serving up the information after 1000 requests. But for other APIs, you have to pay after it hits a certain number of requests, and other (evil) developers can exploit this and use your API to make tons of requests and then you end up footing the bill. I’ll show you how to keep your API key hidden in a little bit.
So to get your API key, go to their website, and you’ll need to fill out a form: https://api.nasa.gov/index.html#apply-for-an-api-key
Go ahead and fill it out and it will immediately return your API key. They will also email you a copy of it, so don’t worry about saving this page.
Hiding Your API Key
Now, to save your API key without showing it to the world via Github, we’ll be taking advantage of the .gitignore file. Double check that you have one. It’ll be in your app’s root folder.
We’ll be setting the API key to a constant in a file called .env and then adding the .env file to the .gitignore file. To make all this work seamlessly, however, we’ll need to add a gem to our gemfile.
The gem we’re adding is the dotenv-rails gem. This allows us to set environment variables in a file named .env.
At the bottom of your Gemfile: (Note: NOT your terminal)
gem 'dotenv-rails', :groups => [:development, :test]
Now run bundle install to install it:
$ bundle install
Now create a new file in the root folder, and name .env
Type in NASA_API_KEY and make sure to use all caps when you do this, it signals that it’s a constant for the app, which is a level higher in terms of scope than a variable. Set this equal to your API key, no quotes necessary.
In your .env file (replace DEMO_KEY with your actual API key):
NASA_API_KEY=DEMO_KEY
Go to your .gitignore file and type in .env – this will tell git to ignore your .env file when committing files.
In your .gitignore file (optionally, you can delete everything already there):
.env
Let’s commit that small change:
$ git add .
$ git commit -m “add environment variable and .env to gitignore file”
Adding Logic to the Model
Now that we’ve got our API key set up, let’s put it to use. First, we’re going to create a method and then put in all the info about the API into it.
Navigate to your nasa_api model – app/models/nasa_api.rb:
def self.get_api_info
end
We’re using self in front of the method name so that we don’t have to create a new instance of the class to use this method. The method works on the class itself.
What we’re trying to accomplish here is tell rails to go visit the webpage with the JSON information on it, and also to understand that the info it’s seeing is JSON so that we can access the specifics later.
To do that, let’s just go ahead and add in our full URL with the API key. We’re not setting this to anything because it’s just a reference for us right now. We’re also going to get the API key from our .env file, but there’s kind of a special way to do this outside of just plain string interpolation.
In your nasa_api model:
def self.get_api_info
  # "https://api.nasa.gov/planetary/apod?api_key=#{ENV['NASA_API_KEY']}"
end
Let’s reverse engineer this. We know we have an API made up of JSON, so we need to tell rails to look for JSON and tell it what to do with it. We’ll use JSON.parse for this. The “JSON” module that this is referencing is something that comes standard with rails. When we tell it to parse the JSON, it’ll return a Ruby hash that we can then easily pick apart.
Continuing to add to the self.get_api_info method:
def self.get_api_info
  # "https://api.nasa.gov/planetary/apod?api_key=#{ENV['NASA_API_KEY']}"
  JSON.parse
end
We’ve got the location of the JSON (the URL with our API key), but now we need to tell rails to go to the internet and make that HTTP GET request, which we can do with the Net::HTTP module that comes standard with Ruby.
Continuing to add to the self.get_api_info method:
def self.get_api_info
  # "https://api.nasa.gov/planetary/apod?api_key=#{ENV['NASA_API_KEY']}"
  JSON.parse Net::HTTP.get(URI(
  "https://api.nasa.gov/planetary/apod?api_key=#{ENV['NASA_API_KEY']}"
  ))
end
A Quick Detour to the Rails Console
We can actually see this in action in the rails console. Pull up your terminal/command line and cd into your project folder. Let’s test this just with the DEMO_KEY
In your terminal:
$ rails console
This should return something like IRB:
Loading development environment (Rails 4.2.5.1)
2.2.3 :001 >
Now just continue to type like you would in IRB or in a plain ruby file:
$ JSON.parse Net::HTTP.get(URI("https://api.nasa.gov/planetary/apod?api_key=DEMO_KEY"))
And press enter. The result should be a ruby hash!
=> {"copyright"=>"Roberto Colombari", "date"=>"2016-04-28", "explanation"=>"This huge ball of stars predates our Sun. Long before humankind evolved, before dinosaurs roamed, and even before our Earth existed, ancient globs of stars condensed and orbited a young Milky Way Galaxy. Of the 200 or so globular clusters that survive today, Omega Centauri is the largest, containing over ten million stars. Omega Centauri is also the brightest globular cluster, at apparent visual magnitude 3.9 it is visible to southern observers with the unaided eye. Cataloged as NGC 5139, Omega Centauri is about 18,000 light-years away and 150 light-years in diameter. Unlike many other globular clusters, the stars in Omega Centauri show several different ages and trace chemical abundances, indicating that the globular star cluster has a complex history over its 12 billion year age.", "hdurl"=>"http://apod.nasa.gov/apod/image/1604/OmegaCen_Colombari_1833.jpg", "media_type"=>"image", "service_version"=>"v1", "title"=>"Omega Centauri: The Brightest Globular Star Cluster", "url"=>"http://apod.nasa.gov/apod/image/1604/OmegaCen_Colombari_960.jpg"}
Now that’s something that Rails understands and something we can work with.
We can set it to a variable and start pulling values out, like so:
$ api = _
$ api['date']
 => "2016-04-28"
$ api['copyright']
 => "Roberto Colombari"
Note: Setting a variable to _ simply sets the last return value to that variable. Can be very useful!
Back to the Model
Now back in your model, the command is kinda long. Typically you wouldn’t want your lines to go over 80 characters, just for readability purposes. Remember that the chief concern with Ruby and rails is developer readability. I’m going to make this a little easier to digest by setting some chunks of that to variables.
def self.get_api_info
  nasa_api = "https://api.nasa.gov/planetary/apod?api_key=#{ENV['NASA_API_KEY']}"
  request_to_nasa_api = Net::HTTP.get(URI(nasa_api))
  JSON.parse request_to_nasa_api
end
Let’s commit our changes
$ git status
$ git add .
$ git commit -m "add logic to model"
Onto the Controllers
If we restart our server, you’ll notice we get taken to the same Rails app start page. We need to fix that by adding a controller.
$ rails g controller NasaPicture index --pretend
Here you can see I’m pretending to generate a controller called NasaPicture and also a route called index.
That command will return:
 force app/controllers/nasa_picture_controller.rb
 route get 'nasa_picture/index'
 invoke erb
 exist app/views/nasa_picture
 conflict app/views/nasa_picture/index.html.erb
It automatically will generate that route and view for us, which is helpful. Let’s go ahead and create that controller.
$ rails g controller NasaPicture index
So now if we go back to localhost and hit refresh, it’s going to still show the app default page. I want this index page to be the root page, so let’s go to config/routes.rb and change that to:
root 'nasa_picture#index'
Now, go back to your localhost:3000 and refresh, and you should see what comes default on the index.html.erb page.
Lets go ahead and commit this stuff.
$ git status
$ git add .
$ git commit -m “add controller and index view”
Now we want to be able to actually see this information on the page. Let’s go back to our controller in app/controllers/nasa_picture_controller.rb and add this (the def index and end will already be there, thanks to how we generated the controller):
def index
  @nasa_info = NasaApi.get_api_info
end
This allows us to access that Ruby hash of information (here, the variable that contains the hash is @nasa_info that we made in the model, in our index view. Now, we can start working on our view files.
The View from Space
So now lets go back to the index.html.erb and add that info in plain text.
<h1><%= @nasa_info["title"] %></h1>
<img src="<%= @nasa_info["url"] %>" />
<p><%= @nasa_info["explanation"] %></p>
<p><%= @nasa_info["date"] %></p>
The notation @nasa_info['title'] will return the value of the key “title” in the hash.
Now if we go and refresh – we’ll see the stuff we pulled out of the API!
Let’s commit this again:
$ git status
$ git add .
$ git commit -m "Add photo and description to view"
But It’s Not Always an Image?
Something that is interesting about this API that I couldn’t find documentation for, but I know to be true, is that sometimes the media type is a video, not an image. I’ve only seen YouTube links – which would be rendered differently than an image in the view. So the best way to do this is to go into our controller and write something that tells it to distinguish between a picture and a video. We’re going to go into our controller* and add a new instance variable to the index method.
Let’s go back to our controller in app/controllers/nasa_picture_controller.rb and add this:
def index
  @nasa_info = NasaApi.get_api_info
  @media_type_is_video = @nasa_info['media_type'].eql?('video')
end
* Please note that we could also put this logic in the model. In fact, it is probably more correct to do so, following the “Fat Model, Skinny Controller” design pattern. However, I’m keeping it here in the controller because it’s a relatively tiny piece of code, and keeps a nice time limit on this tutorial.
Let’s go back to the index view and add in some logic for distinguishing between media types. The following code will replace <img src="<%= @nasa_info["url"] %>" />
<% if @media_type_is_video %>
http://%=%20@nasa_info[
<% else %>
<img src="<%= @nasa_info["url"] %>" />
<% end %>
Now let’s pull up the server to double check that everything is still working okay.
$ rails s
Great, now let’s commit.
$ git status
$ git add .
$ git commit -m "Add logic for media types"
Let’s Not Be Basic
At this point, we’ve got a site that completes the goal of using the NASA APOD API.
This API is pretty straightforward, but it’s neat because you can really do a lot of stuff with it, like adding it to an existing app to change the background every day.
To pretty it up a little, I’m going to go through a quick styling of it using Bourbon, which is a CSS framework that is put out by thoughtbot.
I’m just going to reference http://bourbon.io/ and tell you to follow the instructions for installation on there. It’s not quite as straightforward as a bootstrap install, but it’s not too much more difficult either. I actually found this page to be more helpful. Go through all the steps outlined there.
There seems to be a weird bug right now where they’ve updated some of the things that depend on bourbon, but bourbon itself is still in it’s beta phase. So if you get an error about $font-system-stack (which you will in Bourbon < 5), then go to base/_variables and change $font-system-stack to $helvetica. We’ll be changing the font later anyway.
Once you have bourbon installed (you’ll know by looking at your app/assets/stylesheets folder, it will contain bourbon, neat and base folders) from here it gets a little complicated – I retooled index.html.erb a bit, added class names, pulled in some type styling from Refills. I’m going to put them here and if you’d like to just copy and paste them into yours:
For app/views/nasa_picture/index.html.erb: click here
For app/assets/stylesheets/application.scss : click here
A Note on Deploying to Heroku
If you’d like to deploy this app to Heroku, there are a few things you will have to do to get it ready to go. First, you’ll need to add the rails_12factor gem to your Gemfile. This gem just makes your app work a little bit more smoothly with Heroku.
Gemfile:
gem 'rails_12factor'
Heroku can be finnicky sometimes, so if it doesn’t deploy on your first go around, that’s totally normal. Just keep Googling around and you’ll find lots of people are having the same issues as you. It took me ~5 tries to get this one deployed, for reference.
Another thing is that you must set the API key within Heroku once you get the app deployed. It will not reference your .env file. You can check out this post if you need more explanation, but basically you’ll need to cd into your app file and run:
$ heroku config:set NASA_API_KEY=DEMO_KEY
Except replace DEMO_KEY with your actual key in your .env file.
Resources
The whole Github repo is here: https://github.com/mkmckenzie/nasa-wwcdc-demo
If you’d like to check out the live app (note: the stylesheets as described above were not used on this app): click here
Hope that was helpful! Enjoy the stars!
Shoutout to Toby for providing valuable edits & feedback!!

Nice tutorial! Thank you!
LikeLiked by 2 people
Thanks! Glad you enjoyed it!!
LikeLiked by 1 person